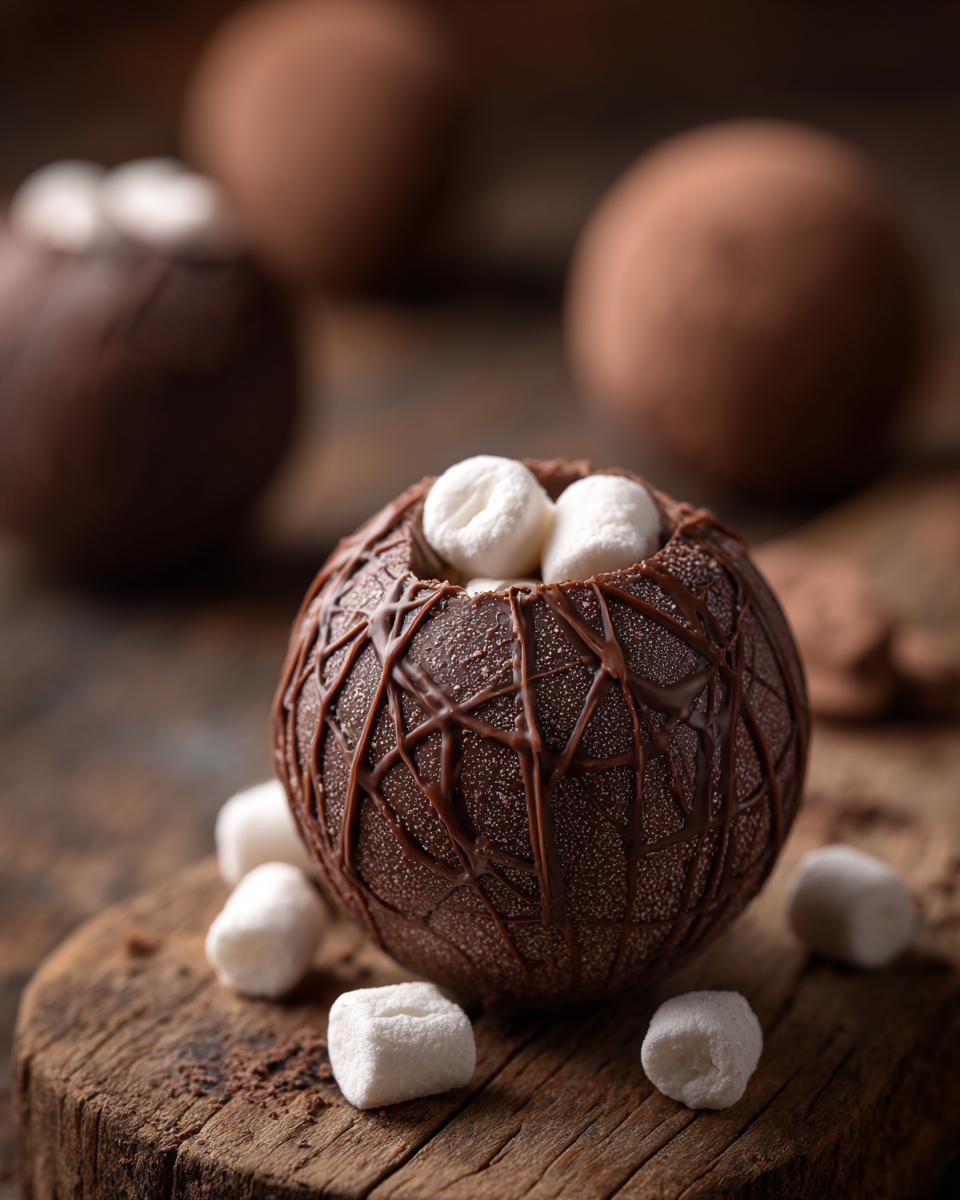
Oh my gosh, you guys, get ready for some serious holiday magic because we need to talk about Hot Chocolate Bombs! Seriously, these little spheres of joy are the coolest thing. Picture this: the holidays are rolling around, it’s super chilly outside, and you’ve got a mug of steaming milk. You drop one of these chocolatey beauties right in, and BAM! It melts away to reveal a super rich, creamy hot chocolate, complete with little marshmallows peeking out. I remember the first time I made these a few years back – my nieces and nephews thought I was a wizard! They’re such a fun DIY holiday treat, way more exciting than just stirring cocoa powder. Making them yourself is surprisingly easy, and they look so impressive. It’s definitely my go-to for a fun, DIY, and totally knock-your-socks-off present or just a cozy treat for yourself.
Why You’ll Love These Hot Chocolate Bombs – Fun DIY Holiday Treat
Seriously, these Hot Chocolate Bombs are a total game-changer for cozy season! Here’s why you’ll be obsessed:
- They’re SO easy to make! Don’t let their fancy look fool you, these are totally do-able.
- Instant wow-factor! Drop one in hot milk and watch the magic happen – it’s pure theater.
- Seriously delicious! You get rich, creamy hot chocolate that tastes so much better than the packet stuff.
- The perfect gift! Package them up pretty and you’ve got an amazing homemade present for anyone on your list.
- Customizable! You can get creative with different chocolates and decorations.
Gather Your Ingredients for Hot Chocolate Bombs
So, what do you need to make these little spheres of deliciousness? It’s simpler than you think! Make sure you’ve got these bits and bobs handy:
- 2 cups chocolate chips: Trust me on this, use good quality chocolate chips! They melt so much better and taste way richer. Milk, semi-sweet, or even dark chocolate work great, whatever makes your taste buds happy.
- 1/4 cup coconut oil: This helps make the chocolate super smooth and luxurious when it melts.
- 1/2 cup hot cocoa mix: Your favorite kind! This is what gives it that yummy chocolate flavor base.
- 1/4 cup powdered sugar: For a little extra sweetness and to help thicken things up when the milk hits it.
- 1/4 cup mini marshmallows: The classic hot chocolate companion! They melt right into the drink.
- Optional: Sprinkles, edible glitter, or even crushed candy canes: This is where you can get really creative and make them extra festive!
Using good quality chocolate really does make a world of difference in how these taste and how smooth they get. So grab the best you can find!

Essential Equipment for Making Hot Chocolate Bombs
Alright, to whip up these fun Hot Chocolate Bombs, you don’t need a whole fancy kitchen setup. Just a few key things will do the trick:
- Silicone sphere molds: These are non-negotiable! You can find them in lots of sizes, but the 2-3 inch ones are perfect.
- Microwave-safe bowl: For melting all that gorgeous chocolate.
- Spatula or spoon: To stir your chocolate smooth and to help coat the molds.
- A small plate or baking sheet: To hold your finished bombs before they’re ready to decorate or seal.
Step-by-Step Guide to Crafting Your Hot Chocolate Bombs
Alright, let’s get down to business and make these amazing Hot Chocolate Bombs! It’s really not as tricky as it looks, just follow these steps and you’ll be sipping on the best mug of hot chocolate ever.
Melting the Chocolate
First things first, we need perfectly smooth chocolate. Pop your chocolate chips and that little bit of coconut oil into a microwave-safe bowl. Microwave it in 30-second bursts, stirring really well in between each one. Keep going until it’s all beautifully smooth and glossy. Be careful not to overheat it, or it can get all weird and seize up!
Coating the Molds
Now for the molding part! Carefully spoon that luscious melted chocolate into your silicone sphere molds. You want to get a nice, even coat all the way up the sides. A small spatula or even just tilting the mold works wonders. Once they’re all coated, pop those molds into the fridge for about 10 minutes. You want them firm, not rock hard, so they hold their shape.
Filling and Sealing the Bombs
Once they’re chilled and have firmed up, gently pop the chocolate shells out of the molds. Now for the fun part – filling! Take about half of your empty shells and spoon in your hot cocoa mix, powdered sugar, and those adorable mini marshmallows. Don’t overfill them! To seal them up, take an empty chocolate shell, and *carefully* warm its rim for just a few seconds (I just gently rub it on a warm, dry plate). Then, quickly press it onto a filled shell. It’ll melt just enough to stick and seal your bomb shut. Ta-da! You’ve got a sealed bomb!
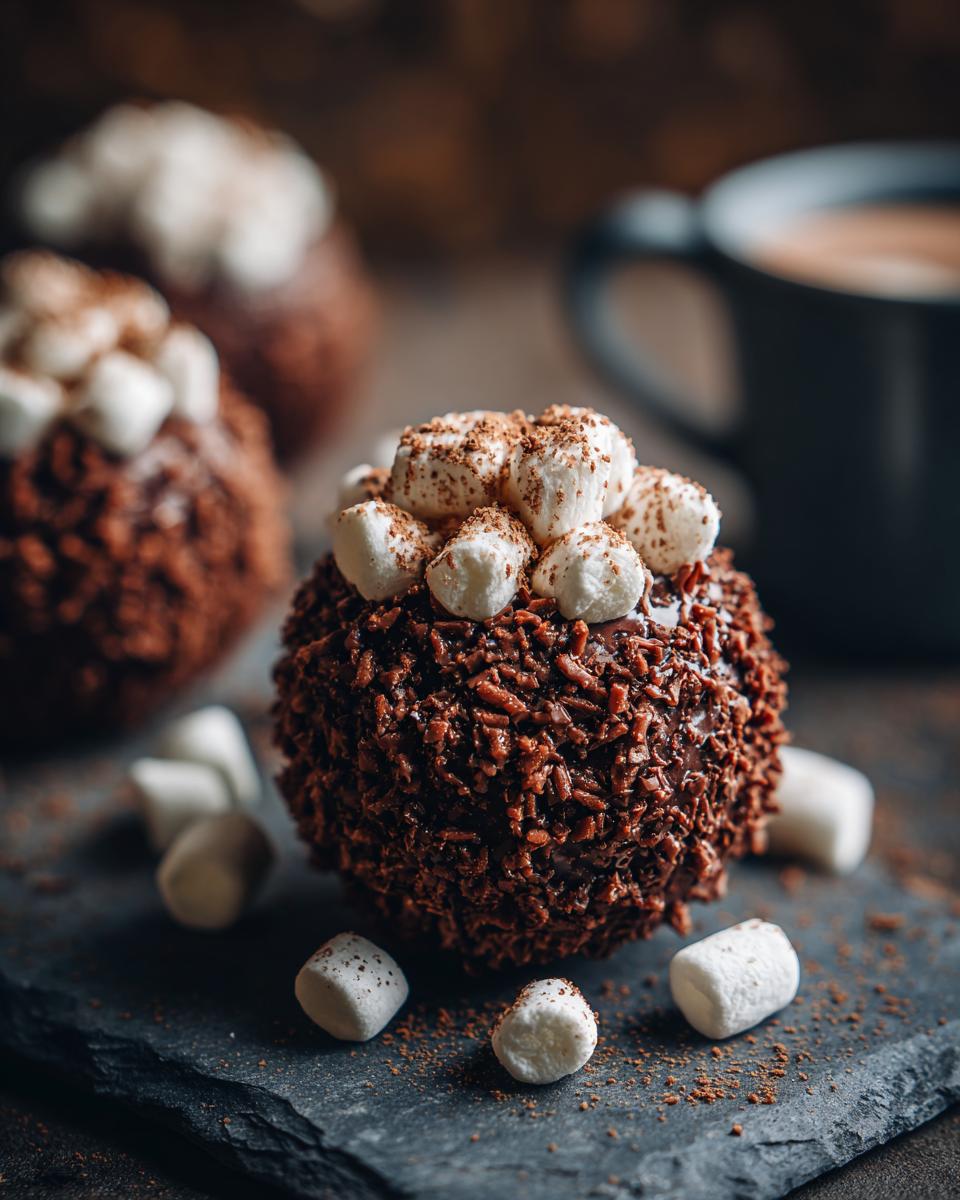
Decorating Your Hot Chocolate Bombs
This is where you can really let your creativity shine! If you’re using sprinkles, edible glitter, or even some crushed candy canes, now’s the time to add them. Just a little drizzle of extra melted chocolate to act as glue, then sprinkle away!

How to Enjoy Your Hot Chocolate Bombs
The grand finale! Grab your favorite mug, pop one of your gorgeous hot chocolate bombs right in the center, and then pour about 8-10 ounces of steaming hot milk over it. Give it a good swirl with a spoon, and watch the magic happen as the chocolate melts away, releasing all that cozy goodness. You can grab a rich chocolate lava cake while you wait, but trust me, this hot chocolate is worth the anticipation!
Tips for Perfect Hot Chocolate Bombs
Alright, let’s talk about making these Hot Chocolate Bombs absolutely perfect every single time! I’ve learned a few tricks along the way that make all the difference.
- Don’t skip the good chocolate! I know I mentioned it in the ingredients, but seriously, using good quality chocolate chips will make your bombs look shinier and taste way more luxurious. If you’re feeling adventurous, you can even temper your chocolate for that super professional snap and shine, though it’s definitely not required!
- Molds MUST be clean and DRY! This is super important. Any little bit of water or residue can make your chocolate seize up or look splotchy. Use a clean cloth and make sure those molds are spotless.
- Sealing is key: When you’re warming the rim of the empty shell to seal, be quick and gentle. You just want it to be warm enough to melt *slightly*, not so much that it starts to drip everywhere. A few seconds on a warm plate should do it!
- Storage matters: Keep your finished bombs in a cool, dry place. Humidity is the enemy here! If your kitchen is warm, the fridge is your friend, but make sure they’re in an airtight container so they don’t pick up any weird smells. So, store them away from sunlight and heat to keep them looking and tasting their best.
And hey, if you love these, you should totally check out my Apple Pie Bombs too – they’re another fun treat!
Ingredient Notes and Substitutions
Let’s chat about these ingredients for a sec! The chocolate chips? Yeah, I mentioned it, but using good quality ones really makes a difference, like semi-sweet or milk chocolate chips are usually my go-to. You can even try dark chocolate if you’re feeling fancy! Now, that coconut oil is there to help the chocolate melt super smooth, but if you don’t have any, a little bit of unsalted butter or even vegetable oil can work in a pinch. Just use about the same amount. And for the filling, feel free to experiment with different kinds of tiny marshmallows or add a pinch of cinnamon to your hot cocoa mix!
Frequently Asked Questions about Hot Chocolate Bombs
Got questions about these magical Hot Chocolate Bombs? I’ve got you covered! Let’s dive into some common queries:
Can I use candy melts instead of chocolate chips?
Oh, absolutely! If you’re looking for something a *little* easier to work with, candy melts are a great alternative. Stick to good quality ones, though. They melt beautifully and harden up really well without needing oil. Just follow the same melting and molding steps!
How long do hot chocolate bombs last?
Great question! If you store them properly in a cool, dry place (think airtight container away from sunlight!), they can last for a good few weeks, maybe even up to a month. The chocolate and dry ingredients are pretty stable. Just make sure your kitchen isn’t super humid or hot, or they might get a bit melty or lose their shine.
Can I make them dairy-free?
You sure can! Just use dairy-free chocolate chips (there are some amazing dark chocolate options out there) and dairy-free marshmallows. For the coconut oil, you can stick with that or use another plant-based oil like sunflower or canola. The hot cocoa mix usually has dairy, so check the label or make your own dairy-free blend!
What if my chocolate shells break when I unmold them?
Don’t panic! It happens sometimes. They might have been chilled a little too long and got brittle, or maybe the coating wasn’t thick enough. The good news is, you can totally salvage them! Just lovingly piece the broken bits back together and use them as “scoops” for your hot milk. You can also just re-melt the chocolate and try again – practice makes perfect!
Nutritional Information
So, you’re curious about the deets? Here’s a rough idea of what you’re getting in one of these glorious Hot Chocolate Bombs. Keep in mind, this is just an estimate and can totally change depending on the chocolate you use and how generous you are with the fillings!
- Serving Size: 1 bomb
- Calories: Around 200
- Fat: About 12g
- Carbohydrates: Roughly 25g
- Protein: Around 3g
It’s definitely a treat, so enjoy it guilt-free!
Share Your Hot Chocolate Bomb Creations!
I just LOVE seeing what you all create in your kitchens! If you make these Hot Chocolate Bombs, please, please, PLEASE share your pics and tell me all about it in the comments below. What did you decorate them with? Did your family flip out over them? You can also tag me on social media – I’d love to see your masterpieces! And if you tried and loved this recipe, a quick rating would be amazing too! If you have any extra questions or want to share your own tips, you can always reach out too!
Print
Hot Chocolate Bombs
- Total Time: 40 min
- Yield: 6 bombs
- Diet: Vegetarian
Description
A fun DIY treat for the holidays, these hot chocolate bombs create a rich and creamy hot chocolate experience.
Ingredients
- 2 cups chocolate chips
- 1/4 cup coconut oil
- 1/2 cup hot cocoa mix
- 1/4 cup powdered sugar
- 1/4 cup mini marshmallows
- Optional: sprinkles, edible glitter
Instructions
- Melt chocolate chips and coconut oil in a microwave-safe bowl in 30-second intervals, stirring until smooth.
- Pour melted chocolate into silicone sphere molds, coating the sides evenly. Chill for 10 minutes until firm.
- Remove chocolate shells from molds.
- Fill half of the shells with hot cocoa mix, powdered sugar, and marshmallows.
- Warm the rim of an empty shell slightly and press it onto a filled shell to seal.
- Decorate with sprinkles or edible glitter if desired.
- To use, place one bomb in a mug and pour hot milk over it. Stir until melted and combined.
Notes
- Use good quality chocolate for the best flavor.
- Ensure molds are completely dry before adding chocolate.
- Store bombs in a cool, dry place.
- Prep Time: 30 min
- Cook Time: 10 min
- Category: Dessert
- Method: Molding
- Cuisine: American