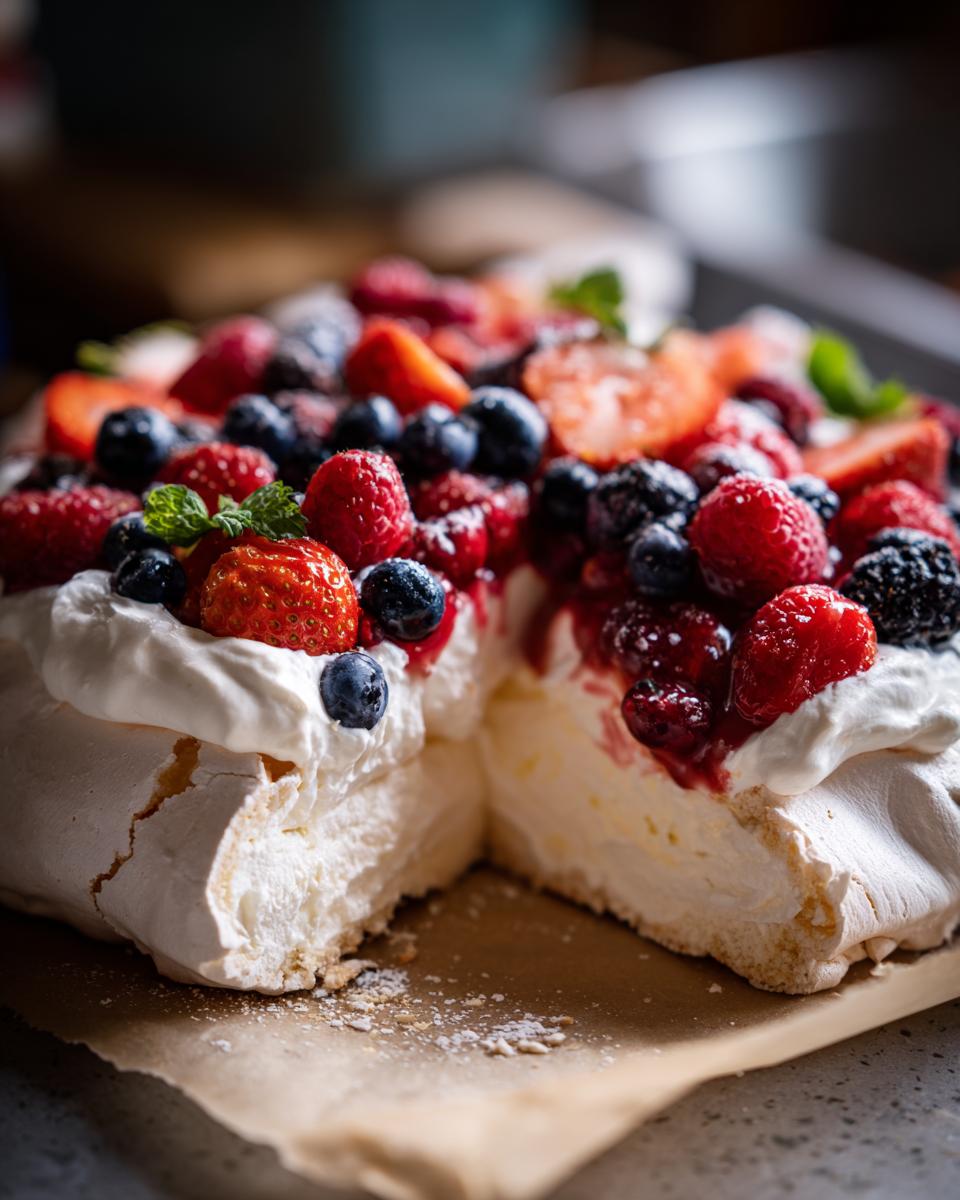
When those twinkling lights go up and the air gets that cozy chill, you just *know* it’s time for some seriously special holiday baking. And for me, nothing screams ‘festive celebration’ quite like a show-stopping Christmas Pavlova! I remember the first time I pulled one out of the oven – this impossibly white, delicate cloud that promised pure magic. It’s got this incredible contrast – a crisp, crackly shell that gives way to a soft, gooey, marshmallowy center. Topped with swirls of cream and a jewel-toned pile of berries, it’s just divine. This Christmas Pavlova recipe is absolutely our family’s go-to, and it always disappears in a flash!
Why This Christmas Pavlova Recipe is a Holiday Must-Have
Okay, so why is this Christmas Pavlova recipe such a winner, especially during the holidays? Let me tell you! First off, it looks absolutely stunning on any festive table. That bright white meringue with all the colorful fruits just screams ‘special occasion!’ But it’s not just about looks, oh no. It’s surprisingly easy to make, even if you’re a little nervous about meringue. Plus, it’s naturally gluten-free, which is a huge win when you’ve got guests with dietary needs. Think about it: a dessert that’s show-stopping, mostly foolproof, and caters to everyone? It’s a no-brainer for Christmas!
Here’s the lowdown on why you NEED this pavlova in your holiday lineup:
- Impressive Presentation: It’s a showstopper! Everyone will be oohing and aahing over this dessert.
- Surprisingly Simple: Honestly, the steps are straightforward. It feels fancy, but it’s totally doable.
- Crowd-Pleaser: That delightful crunch followed by the soft, fluffy center? Pure heaven for most people.
- Naturally Gluten-Free: Perfect for those guests who need to avoid gluten – you get elegance without the worry.
- Festive Perfection: With its crisp white shell and colorful toppings, it just fits right in with the Christmas vibe.
Gather Your Ingredients for the Perfect Christmas Pavlova
Alright, let’s talk about what you’ll need to get this beautiful Christmas Pavlova on your table. Don’t worry, it’s not a super long list, and using the good stuff really makes a difference! Here’s what’s going into our magical meringue creation:
You’ll need:
- 6 large egg whites – make sure they’re at room temperature! This helps them whip up like a dream.
- 300g caster sugar – this fine sugar dissolves so beautifully into the meringue.
- 1 tsp cornflour – sifted, please! It helps give that lovely marshmallow texture inside.
- 1 tsp white vinegar – don’t skip this! It stabilizes the meringue and keeps that gooey middle.
- 500ml double cream – nice and chilled, ready for whipping.
- 1 tsp vanilla extract – for that classic, comforting flavor in the cream.
- Assorted fresh berries – I love a mix of strawberries, raspberries, and blueberries. Make sure they’re washed and hulled, ready to go.
- Fresh mint sprigs – just a few, for that pop of color and freshness when you garnish.
Step-by-Step Guide to Making Your Christmas Pavlova
Alright, let’s get down to the nitty-gritty of making this beauty! It might seem a bit daunting, but trust me, it’s mostly about patience and a little bit of love. Follow these steps, and you’ll have a stunning Christmas Pavlova that’ll have everyone begging for the recipe.
Preparing the Meringue Base
First things first, your bowl and whisk need to be squeaky clean and totally grease-free. Seriously, even a tiny bit of oil can ruin your meringue! I like to give mine an extra wipe with a paper towel and a splash of vinegar just to be sure. Pop your oven on to 150°C (that’s 130°C fan or Gas Mark 2), and line a baking sheet with parchment paper. You want to draw a nice big circle on there, about 20cm across – this is your guide! Now, whisk those egg whites until they’re looking like stiff, glossy peaks. And then, the patient part: add the caster sugar, just a tablespoon at a time, whisking really well after each addition. You want it to get super thick and shiny, like marshmallow clouds! If you’re keen on some extra festive flavor for your toppings later, you might even want to whip up some old-fashioned pumpkin pie spiced whipped cream to have on hand!
Baking and Cooling Your Christmas Pavlova Shell
Once your meringue is looking perfect and glossy, it’s time to gently fold in the cornflour and white vinegar. Just a few quick folds – you don’t want to knock out all that lovely air you just whipped in! Spoon this glorious mixture onto your marked circle on the baking sheet. I like to make a little well in the middle with the back of my spoon; it’s perfect for holding all that yummy cream later. Now, into the oven it goes for about 1 hour and 15 minutes. It should sound hollow when you tap the outside. Crucially, turn off the oven after that time and let your pavlova cool completely inside with the door just a tiny bit ajar. This slow cooling is the *secret* to preventing cracks!

Whipping the Cream and Assembling the Festive Dessert
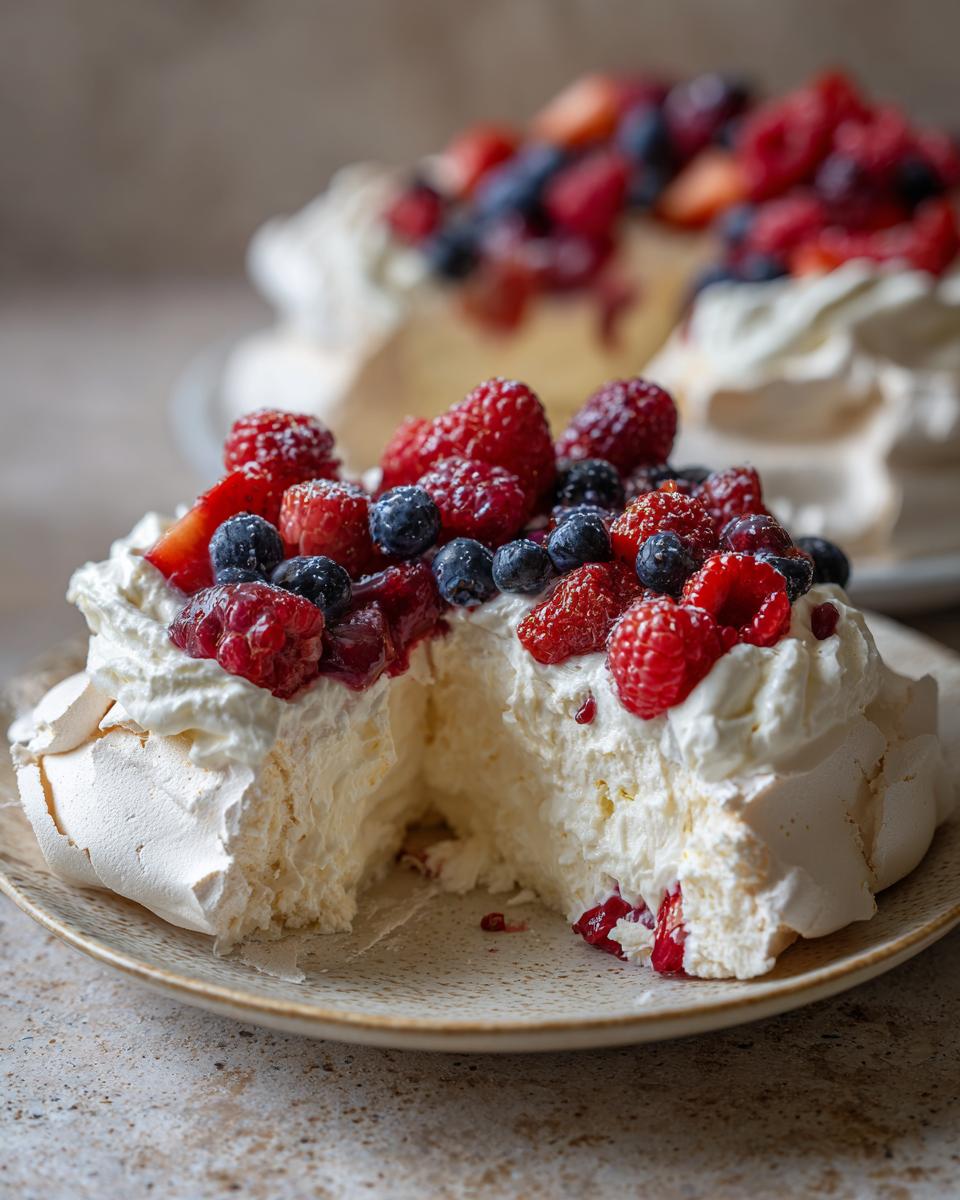
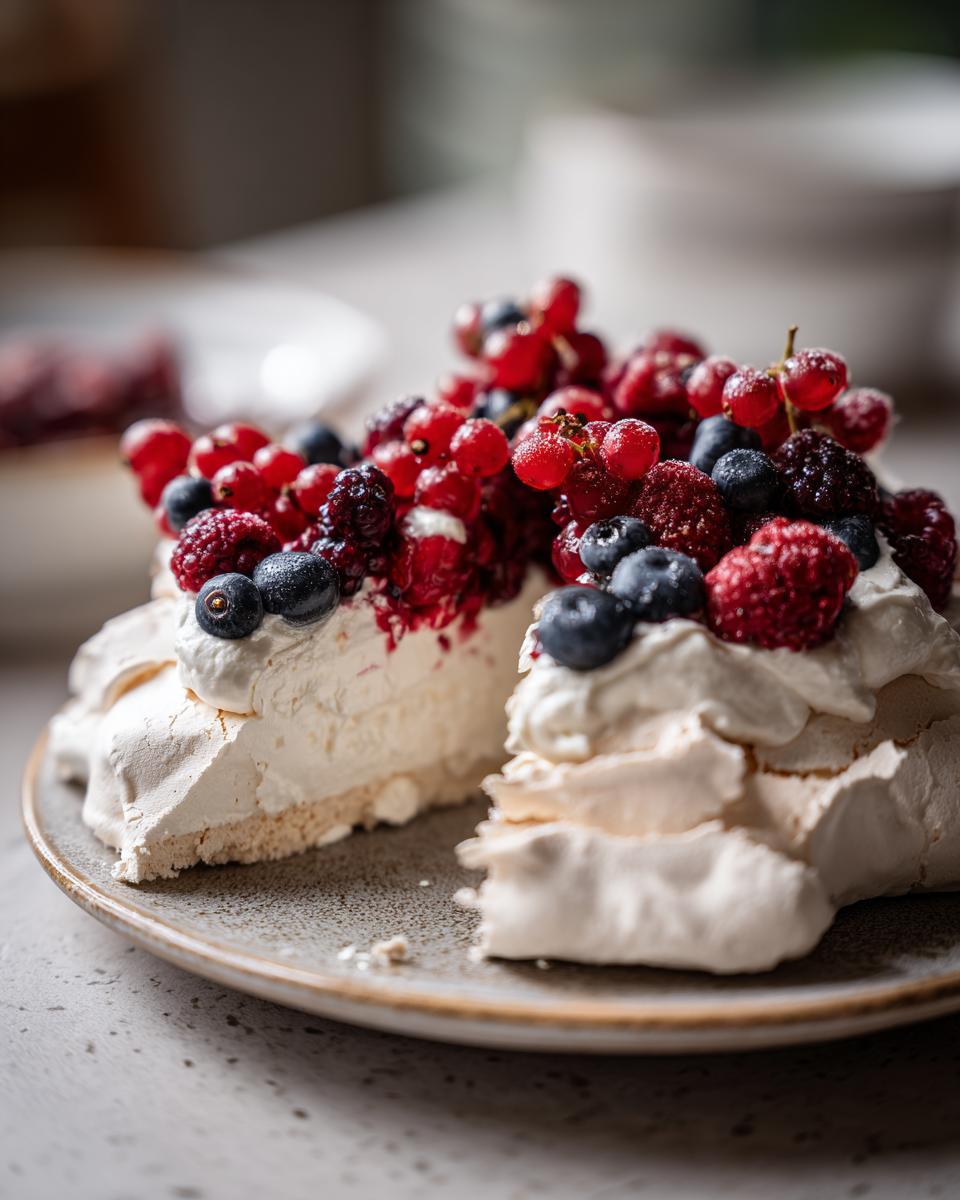
Once your pavlova shell is completely cool – and I mean *completely*, otherwise, you’ll have a melty mess! – it’s time for the fun part. Grab your chilled double cream and that vanilla extract. Whip it up until you’ve got lovely soft peaks. Don’t overdo it, or you’ll end up with butter! Spoon this glorious, creamy goodness right into that well you made in the cooled meringue. Arrange your beautiful fresh berries all over the top. A few mint sprigs just add that elegant finishing touch. It looks so pretty, and the flavors are just *chef’s kiss*. If you want to jazz it up even more, maybe add some strawberry shortcake cheesecake inspired swirls of sauce or some fluffy whipped cream!
Tips for the Ultimate Christmas Pavlova
Making a truly spectacular Christmas Pavlova is totally doable, and I’ve picked up a few tricks over the years that really make a difference. You want that perfect crisp shell and that lovely soft center, right? So, here are my golden rules to make sure your pavlova is an absolute winner every single time. Think of these as the little secrets that elevate a good pavlova to an unforgettable one!
- Egg Whites are Key: Seriously, make sure they are at room temperature and that your bowl is spotless and totally grease-free. Any hint of yolk or oil and your meringue just won’t whip up properly. I usually separate my eggs a day ahead and let them sit out.
- Sugar, Sugar, Sugar: Add it slowly! Don’t dump it all in at once. Whisking in each spoonful until it’s dissolved makes the meringue glossy and stable. This is where that lovely texture comes from!
- Cooling is Crucial: This is probably the MOST important tip for avoiding those dreaded cracks. Turn off the oven, crack the door open, and just let it cool down slowly inside. It’s like giving your pavlova a warm hug as it settles. If you’re planning a festive feast, you could even prep a cranberry meringue cake style pavlova shell a day ahead and store it in an airtight container – it keeps beautifully!
- Cream Perfection: Whip your double cream until it just holds soft peaks. Over-whipped cream can make things go a bit grainy, and nobody wants that.
Variations and Festive Toppings for Your Pavlova
While the classic Christmas Pavlova with berries is absolutely divine, don’t be afraid to get a little creative! This recipe is like a blank canvas, just begging for a festive makeover. You can totally switch up the fruits depending on what’s seasonal and what you love. Think about adding some gorgeous pomegranate seeds for extra sparkle, or maybe some juicy chunks of mango if you’re dreaming of a tropical Christmas!
And what about sauces? A drizzle of chocolate sauce or a warm cranberry marble pound cake inspired coulis could be amazing. For a completely different vibe, imagine a pavlova topped with passionfruit pulp – that tangy sweetness is just divine. You can even adapt this for birthdays or other celebrations by changing the fruit and color!
Understanding the Nutrition of Your Christmas Pavlova
Now, let’s talk about the good stuff – what’s in your beautifully festive Christmas Pavlova! Keep in mind these are just estimates, because, you know, homemade always has a little wiggle room depending on your cream and berries. But generally, a slice of this delight clocks in around 450 calories, with about 55g of sugar and 25g of fat. It also offers around 50g of carbohydrates and a modest amount of protein. It’s a treat, for sure, meant for special occasions!
Frequently Asked Questions About Christmas Pavlova
Got questions about making your Christmas Pavlova the star of the show? I’ve got answers! It’s totally normal to have a few thoughts swirling around when meringue is involved. Here are some common ones I get:
Can I make the pavlova shell ahead of time?
Yes, you absolutely can! This is one of my favorite tips, honestly. Once the pavlova shell is completely cool, carefully wrap it in plastic wrap or pop it into an airtight container and store it at room temperature. I wouldn’t put it in the fridge, though, as that can make it a bit sticky. It’ll stay perfectly crisp for at least a day, sometimes even two!
Why did my pavlova crack?
Oh, don’t you worry about cracks – they happen to the best of us! Most of the time, a crack means your pavlova is perfectly ripe inside. It usually happens if the oven door is opened too soon during cooling, or if the temperature fluctuates a lot. My best advice is to follow that slow-cooling method – turn the oven off and leave it inside with the door ajar. It really helps!
What are good fruit alternatives for topping?
The beauty of a pavlova is its versatility! While berries are classic, I love using seasonal fruits. Think sliced kiwi, fresh figs, passionfruit pulp for a tropical twist, or even some bright pomegranate seeds for extra sparkle. You could also add some chocolate shavings or a drizzle of fruit coulis for something different. It’s a great base for so many delicious combinations, check out more dessert ideas for inspiration!
Share Your Festive Creations!
Have you made this absolutely gorgeous Christmas Pavlova? I’d LOVE to hear all about it! Did it disappear as fast at your place as it does at mine? Please leave a comment below, share your tips, or even rate the recipe! And if you snapped some pictures of your beautiful creation, tag me on social media – I can’t wait to see them! You can also reach out via my contact page!
Print
Christmas Pavlova
- Total Time: 1 hr 35 min
- Yield: 8 servings
- Diet: Vegetarian
Description
A classic meringue dessert with a crisp exterior and soft, marshmallow-like interior, topped with whipped cream and festive fruits.
Ingredients
- 6 large egg whites
- 300g caster sugar
- 1 tsp cornflour
- 1 tsp white vinegar
- 500ml double cream
- 1 tsp vanilla extract
- Mixed berries (strawberries, raspberries, blueberries)
- Mint sprigs for garnish
Instructions
- Preheat your oven to 150°C (130°C fan/Gas Mark 2). Line a baking sheet with parchment paper and draw a 20cm circle on it.
- In a clean, dry bowl, whisk the egg whites until stiff peaks form.
- Gradually add the caster sugar, one tablespoon at a time, whisking well after each addition until the meringue is thick and glossy.
- Gently fold in the cornflour and white vinegar.
- Spoon the meringue onto the prepared baking sheet, shaping it into a circle and creating a slight well in the center.
- Bake for 1 hour and 15 minutes, or until the meringue is crisp on the outside and sounds hollow when tapped. Turn off the oven and let the pavlova cool completely inside with the door slightly ajar.
- Whip the double cream with the vanilla extract until soft peaks form.
- Just before serving, spoon the whipped cream into the cooled meringue shell.
- Top with mixed berries and garnish with mint sprigs.
Notes
- Ensure your bowl and whisk are completely free of grease for best results.
- You can make the meringue shell a day in advance and store it in an airtight container at room temperature.
- Add other festive toppings like pomegranate seeds or chocolate shavings.
- Prep Time: 20 min
- Cook Time: 1 hr 15 min
- Category: Dessert
- Method: Baking
- Cuisine: Australian